Resources

Visual Inspection of 6AS7G Tubes

Mises à jour

Checking for Arc-over Failure


The primary failure mode of most 6AS7Gs is arc-over failure. Consequently it is usually an easy process to determine if a 6AS7G will be serviceable in our amplifiers.

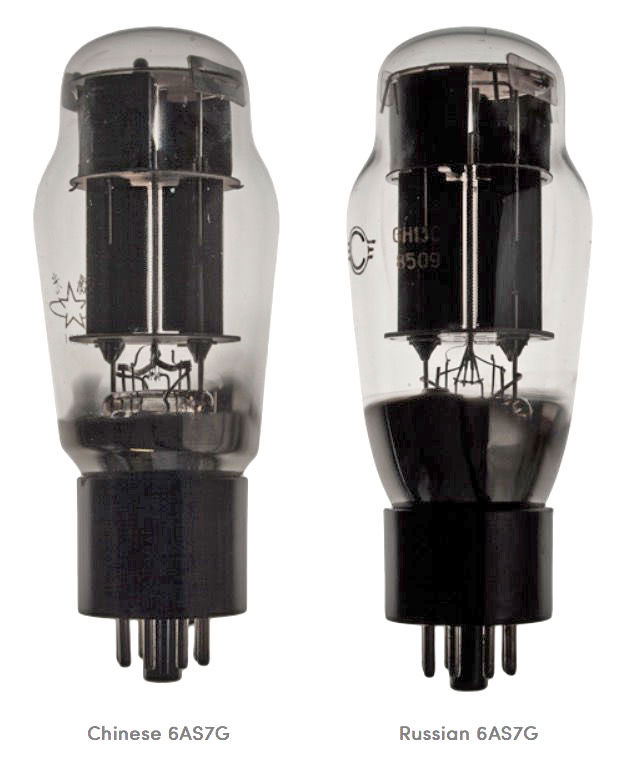
It turns out that 6AS7Gs manufactured in Russia, China, and, in some cases, the United States have what amounts to an internal fuse for each triode section in the tube. The 'fuse link' is readily visible. If either one is blown out, then the tube can be rejected. 

Tube 6AS7G. Lampe Tube 6AS7G.

How to View the 'Fuse Links'


Hold the tube by its plastic base, and get a light source behind it. Inside the tube the metal elements of the tube are readily visible. Rotate the tube by its base until the large gap between the two triode sections is visible. It runs the entire length of the two triode sections (the metal elements of the tube) and is about 3/16th inch wide.

Now rotate the tube by its base an additional 90 degrees and two narrower vertical bands of light will appear (we are now looking through the gaps between the cathodes and plates).

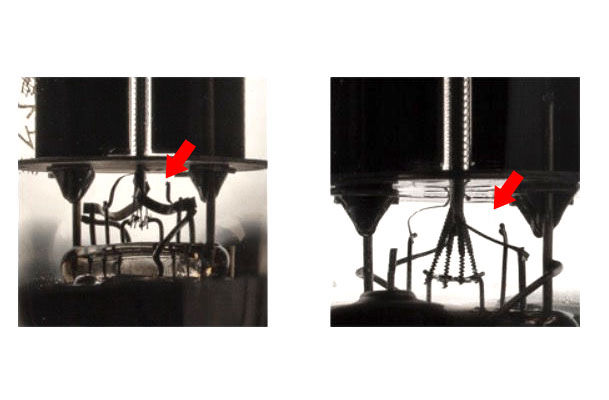
At this point the fuse links are visible below the metal structure of the tube. Beneath the metal elements, wires that support them make their way from the latter into the glass in the base of the tube. If it is a good tube, a delicate ribbon of metal will be seen just to the right of center making a 90 degree arc down to the right, where it is welded to a wire that is embedded in the glass of the base. Just to the left of center, a similar tiny ribbon of metal is making a similar 90 degree arc down to the left.

If both 'fuse links' are intact , then the tube is very likely serviceable. If even one 'fuse link' is missing, then the tube is rejected. In both of the tubes shown here, the right hand triode has arced over and blown out the 'fuse link', while the left hand triodes are still OK. The tube is rejected, as half of its capability is gone.

Tube Malfunctions Visible During Operation

In general these failure modes are much less common: 

If a tube will not light up, it has to be rejected. This is often caused by bad solder joints on the base of the tube and can frequently be repaired by careful application of solder to the filament connections (pins 7 and 8). 

If the tube has a blue florescence just inside the glass, that is OK. On the other hand, if there is a blue or indigo florescence inside the metal structure, the tube should be rejected. 

Sometimes one of the plate sections of a 6AS7G will turn 'cherry' as it is running red-hot. This may not be a tube failure, and the tube should be tried in a different power-tube socket of the amp. If it continues to turn 'cherry', it should be rejected (one the other hand, if all tubes do this in a particular socket, most likely the grid resistor associated with that tube section has been damaged- if this is the case then the tube that was in the socket when the damage occurred should be rejected). Sometimes a tube section will turn 'cherry' as the grid connection in the base of the tube has a bad solder joint (pins 1 and 4), similar to the bad filament connections mentioned above, with a similar remedy.

On very rare occasion, a tube will develop an internal short without blowing the internal fuse links. Such a tube can cause the rear panel fuse to fail. This is a case where a tube tester can be handy to look for the shorted tube. 

The fuse ratings on the amps are chosen so that if the tubes are over-biased, the fuse will blow. Thus if a fuse blows and is replaced, the Bias and DC offset should be tested immediately. Start with the Bias control turned fully counterclockwise. Test the DC offset first. If there are *any* anomalies the amp should be turned off and at this point the tube tester should be used to test for shorts in the tubes. 

In all cases, after a tube fault has been detected and corrected, when the amp is pressed into service, the Bias and DC offset should be tested first thing.
My Amp Lights Up But No Sound/How to find A Bad Tube in Your Amplifier

First check all your power tubes as outlined above. Discard any with blown links.

Check the fuse by the power cord. Its likely blown due to a problem with one or more power tubes. Replace it with the same type and value (it should always be a slow blow type).
Next remove a portion of the power tubes so each half of the amp has the same number of power tubes.

For the MA-1 and MA-2, a good number is 4 tubes in each half of the amp.
For the M-60, a pair in each half.
For the S-30, just run one power tube in each channel and add one per channel as you progress through this procedure.

Warm up the amp. When ready, cycle the red light on and off and see how the meter behaves. If it doesn't do a whole lot, knock gently on the tube tops (with your other hand ready to turn off the red light so as to save the new fuse) and see if any of them react with a flash or pop in the speaker. Check and see the amp responds to adjustment of the DC Offset. If that's OK and nothing else happens, the tubes are good. Obviously if you get a flash or the meter deflects a great deal when you knock on a particular tube, you have found a bad one and it should be replaced.

If they are good, put the amp in Standby, add another pair of tubes and repeat. Do this until the meter misbehaves and/or if you get a tube that flashes or pops. At that point you'll have a pretty good bet which tube or tubes is/are bad.
If you get all the tubes in the amp, don't forget to knock on their tops. All techs that work on tube amps know to check the power tubes for arcs in this manner. Have your hand on the power switch so you can shut it down in case a tube arcs to protect the new fuse.
This procedure is time tested and works very well. If you have any questions please contact us.


Address

Atma-Sphere
1742 Selby Avenue
St. Paul, MN 55104
USA

Contact

Email:
ralph@atma-sphere.com
Tel : +1 651-690-2246